NFT ASSembler Help Doc

The nftASSembler App is part of the Hott Butts Club ecosystem of products and the brainchild of Shawn Cleta and Japonicki. It is built to run on an artist’s browser without their artwork leaving their computer and is 100% free to use for Hott Butt Holders and small collections.
Table of Contents
- What is ASSembler? …and why is it special?
- Mise en place. The checklist of what you need to have before connecting to this app.
- Setting up your collection. How to get the basics of your collection set up and saved.
- Creating and Saving Metadata and Images. How to create your actual collection.
- FAQ. Most frequently asked questions
- Here is where you can find a video tutorial we made on how to use the App.
What is NFT ASSembler? …and why is it special?
NFT ASSembler is an easy-to-use software for artists to assemble the images and metadata for their own NFT collection visually, without knowing code. Here are some things that make NFT ASSembler special:
- Artist friendly and doesn’t require a degree in IT or special software
- Runs on your browser with any operating system
- Images and data never leave your computer
- Easy rarity selection for each trait
- Blend modes for each trait (multiply, soft light, etc)
- Force the assembly of specific combinations you want to be in the collection.
- Ban trait combinations from being created in your collection
- Skin tone feature to have multiple images under one trait name (example: having 4 different skin tones under a single trait “Human”)
- Music assembly
- New updates in the pipeline like provenance hash to prove there was no insider trading.
Mise En Place. Before you get started.
Before you get started with this app you need to have the following items decided and finalized:
- Total number of tokens in collection
- Names of all possible traits and categories
- PNG, GIF or JPG of each trait. These should all be the same dimensions.
The most important part after having the above items is having a folder set up properly so that the NFT ASSembler knows what each trait and category is called. Here are the steps:
- Create a folder for the project and name it after the collection. In this case I want to name my project “Halloween Hott Butts”
- Create folders for each category of traits with exact spelling and capitalization. For Halloween Hott Butts, I want to have the following categories: Background, Butts, Bottom Accessory, Gas, and Top Accessory.
- Save each trait in their respective folders/categories as .png files. You want every image you save to have the exact same dimensions and have the transparency so they will align when they are stacked properly.
*See FAQ if you want to have multiple images share the same trait name (typically used for skin tones).


If you have done the above steps, you are now ready to go to the App and Set up Your Collection!
Setting Up Your Collection
Assuming you have all your folders and files ready to rock let’s go to the website https://nftASSembler.app and get started.
This app is running on your browser so best to not have a ton of applications open on your computer or tabs/windows on your browser.
Start by clicking “Select Directory Button” and navigating to your project directory. Hit “Upload”. *You may get a browser popup asking you to confirm you trust this site to upload, see FAQ on how to verify it is only uploading inter-browser.

The next screen will allow you add:
- Collection Name. This will default to your project folder’s name (recommended). Many series choose to leave this blank.
- Image Directory. This is the only field you can change later on and is where your metadata images will be stored. We recommend putting in an address on a webserver you own at this stage. i.e. https://hottbutts.club/halloween/metadata/img/
- Starting Token ID. You can start your collection at 1 or use this for other creative ideas. If blank the first token ID will be 0 (recommended).
- Number of Tokens. Indicate how many tokens will be in the collection. It must be less than the total possible token count displayed in blue below this input field.
- Order and Requirement of Categories. Drag and drop the order of the layers and click the checkbox to indicate which layers are required. For my collection, only Butts and Background are required for every token.

When you have all the above steps ready, then push the “Open Assembler” button and lets start assembling!

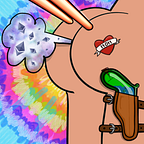
Set up the Blend modes and rarity of each trait
- Be certain there are no blinking red boxes like there is under the Gas category in the middle of the preview image above.
- Adjust each trait to tell it how many tokens that trait should be in but if we don’t have enough, then we will find ourselves with an error.
- Adjust the blend modes if needed.

Required Combos
You can design your own tokens and require them to be in the collection. Egonauts were made entirely with required combos!
- Push “Required Combos” button on left panel of screen.
- Select each trait and click the add button to add them to the collection.

Banned Combos
You can prevent certain tokens from being randomly assembled and can even prevent certain traits from ever appearing together.
- Push “Banned Combos” button on left panel of screen.
- Custom create your tokens here and click the add button to add them to the collection.
- Use an asterisk to designate traits that aren’t part of that banned combo. *see below example where we banned zombies and witches hats from ever appearing.

Once we have all our rarities, blend modes, Required and Banned Combos set up, its time to generate our metadata!
Creating and Saving Metadata and Images.
- Click the “Generate Metadata” button at the top of your screen. A notification will tell us how many combinations were randomly generated.
*Note: If it isn’t able to generate the right number, push the “Generate Metadata” button. It is using a completely random process so it sometimes requires several attempts to generate them all. See FAQ if you are unable to generate all your tokens within 10 attempts.

We can now start to preview our combos in the MetaData Browser by clicking the “MetaData Browser” button at the top of your screen.

We can also rescramble our collection with the “Shuffle Metadata” button.
Lets now save all our work. There are several files you can choose to save. All these files should be saved into your main project directory in order to have them load up next time you log into the assembler app:
Save Config. This saves the following:
- Number of Tokens
- Category Info (Name, Stacking Order, Required or Not Required)
- Trait Info (Rarity and Blend Mode)
- Custom Made Required and Banned Combos
- Collection Name, Description, Image URI location, Token ID Starting Number.
Save MetaData. This allows you to save all your metadata .json files in a zip file straight from the website.
Download Sample. You can download a sample of 100 images with the “Download Sample” button. A progress bar will appear at the top of your screen
Save MetaConfig. This saves the info needed to have your images and metadata professionally assembled by our team. This is useful for large collections too big to generate easily from a browser.

If you’ve followed all these steps, you have succeeded in creating your own collection! Congrats and don’t forget to join our discord and let us know about your project.
Da FAQ.
1. What image format should I use for my traits and what image format does ASSembler output?
All trait images you generate should share the same dimensions and ready to be stacked. We recommend artists save all their traits as PNG files for maximum quality and transparency capabilities(.gif and .jpg file formats are acceptable). We export all tokens as uncompressed, full quality PNG files.
2. How many traits and categories do I need to generate my desired token count?
The formula to determine your number of potential tokens is derived by
multiplying the number of traits in each category by each other.
Let’s look at this example:

*It is important to note that once you start applying rarity to these traits, your total token count drops significantly. I typically recommend having a total possible token count at least 10x as large as your desired token amount if you want to have an uneven distribution of rarity of traits.
3. Is it possible to have multiple skin tones under the same trait name Human?
Yes it is! In order to do this you create a folder with the trait name and put all the various options in this folder
Lets look at this example:

4. How do I know that the images never leave my computer?
You can check the network traffic under the Network Tab in Developer Tools in your browser to verify all network traffic. In Firefox you can find this by going to Tools>Browser Tools>Web Developer Tools.
5. I don’t know what I’ve done but I need to start over, how do I do that?
The best way to start over is to go to close your web browser, open up your project folder and delete the config.json and i-metadata.json files (if they are there). Then go to the top of this article and follow the tutorial from the beginning.
6. What blend mode options are there and how do they work?
We use ImageMagic to blend our images. All the info on the various blend modes and how they work can be found here https://stackoverflow.com/a/43005593
7. Why can’t I get the Metadata Generator button to generate all the tokens?
If after 10 attempts you are unable to generate the proper number of tokens, you have created too much rarity in one or more traits. The solutions are to make some traits more common, or start over and add new traits or categories to increase your total possible combinations. It is recommended to have at least 10x the possible combos as number of tokens you are trying to generate but that number could be 30x if you are trying to have a lot of very rare traits.
8. What if I like my settings but I want to do a new scramble of traits?
You can! Just delete the metadata.zip and ir_metadata.json files from your project, load it up and start this section Creating and Saving Metadata and Images over!